Build:Tomb Raider
Tomb Raider is a Character Build in Outward, created by Mollusk.
Summary
-
Tomb Raider This build focuses on mobility and cooldown reduction without having to rely on The Speedster skill tree. You have the option of prepping tough fights with traps and utilizing Mana Ward to handle tight situations.  Breakthroughs
 Required Faction 


Equipment Weapon Off-Hand Head Body Boots Backpack  Storm
Storm 
 Arcane Unison
 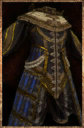 Sang Froid
 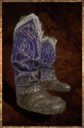 Flux
Flux 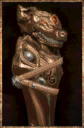
-
Quickslots 1 2 3 4 5 6 7 8 


Full Build Details

With choices like the Scholar Circlet, Master Trader Boots, and Sorobor Academy, this build prioritizes movement speed and cooldown reduction, but sacrifices some defense. As an archer, some of this weakness is counterbalanced naturally, as you can easily kite enemies. In addition, you take Mana Ward to handle situations where you know you'll likely get hit, such as during Sniper Shot and Moon Swipe, or accessing items/spells that aren't on your hotbar.
The Speedster skill tree seems perfect for this kind of build, but unfortunately you lose Alert stacks when hit during Mana Ward. Also, using Probe seems counterintuitive with the rest of the build's playstyle.
Despite taking Pressure Plate Expertise, you shouldn't hotbar pressure plates because they are only really helpful during fight-preparation due to how long they take to deploy.
Take 1-2 points in mana.
Take specialist passive 'Acrobatics'.
Specialist passive 'Cruelty' is optional depending on how vulnerable you feel.
Make sure to get Infuse Mana from the New Sirocco building upgrade.
Open-world: The name of the game here is speed. Your gear, enchants, and passives are going to net you a total of 38% bonus movement speed in combat, but you can throw on an enchanted Light Mender's Lexicon, Jewel Bird Mask, and pop a Marathon potion to hit 75% bonus.
Dungeons: You'll have a few options to how you approach these. Option A is to run around and use Mana Ward before looting chests. Very few things are going to stop you, but it's gonna feel real cheesy clearing dungeons without actually clearing dungeons. Option B is to set up a minefield of traps at the entrance. Throw down Sky Chimes, pressure plate traps (re-useable), and a Runic Trap. You can then lure enemies towards your zone of control with your bow skills, which will proc Aetherbomb.

Swap to venom arrows, then cast Mana Ward and Moon Swipe - with Discipline and Rage boons active, this will inflict Holy Blaze immediately. This combo will be enough to overkill most enemies, and is only more powerful the more pressure plate traps you set up.
Bossing: When you enter a boss arena, start moving and don't stop unless you've used Mana Ward first. Dodge roll and ward your spells until you learn the mechanics of the boss. When your health starts to get low, ward into a health potion from your bag.
Combo
| Initiation | |||||
|---|---|---|---|---|---|
 > >  > >  > >  > >  > >  | |||||