Build:(Mostly) Unkillable Tank
(Mostly) Unkillable Tank is a Character Build in Outward, created by Charmander906.
Summary
-
(Mostly) Unkillable Tank Is completely invulnerable to most types of damage when completely buffed. If you don't have invulnerability to a specific type of damage, then just swap an equip, and boom. Immune.  Breakthroughs
 Required Faction 


Equipment Weapon Off-Hand Head Body Boots Backpack 
 Calm Soul
 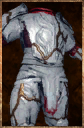 Sang Froid
  Freedom
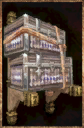
-
Quickslots 1 2 3 4 5 6 7 8 


Full Build Details
Essentially this build abuses every mechanic in the game to obtain 100% resistance in every damage type except for either Frost or Lightning depending on what Helmet you're wearing, in which that damage type will have 90% resistance. You will also have 92% Impact Resistance, although this can go higher, but it's kind of overkill and not really necessary. It is entirely possible (and kind of the point) to get the Exalted Skill and Life Drain using this build. Your health will become basically nothing, but you'll be completely immune to damage (some exceptions listed later), so it's completely fine.
There's a lot to this build that can't exactly be gone over purely through looking at the basic information above, so be prepared for a massive word dump here.
Here's all the equipment you'll need to make this build yourself:
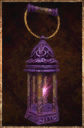
- Lantern of Souls
- Light Mender's Lexicon
- Gold-Lich Mask (Calm Soul)
- Scholar Circlet (Arcane Unison)
- White Priest Hood (Calm Soul)
- Jewel Bird Mask (Calm Soul) <-- Not Required, But Helpful For Travelling
- White Kintsugi Armor (Sang Froid)
- White Kintsugi Boots (Freedom)
- Mefino's Trade Backpack <-- You can use a different Backpack if you want, but this helps store more potions
- As Many Assassin Elixirs As You Can Get
- As Many Golem Elixirs As You Can Get
- As Many Stoneflesh Elixirs As You Can Get
- As Many Elemental Resistance Potions As You Can Get
- Varnishes If You're Feeling Fancy
So in terms of pre-character preparation, here's what you have to do:
If we want to obtain the White Kintsugi Armor and Boots and a Lantern of Souls as a Holy Mission Character, we need to use Legacy Chests. If you didn't know already, the White Kintsugi Set has to be obtained through Legacy Chests anyway, but in order to get a Lantern of Souls, you need to make a character that follows the Blue Chamber Faction, and then Legacy the Lantern to give it to our new overpowered friend. Alternatively, you can use Split Screen to get around Legacy Chest-ing the Lantern, and you can also use Split Screen to abuse getting the White Kintsugi Set by continuously placing items specifically in the Cierzo Storage Legacy Chest and making new characters over and over, although this is pretty much cheating, and you don't have to do it if you don't want to, but it does speed things along.
Now for the actual character prep, as that takes a little more work.
You're going to want to get the Light Mender's Lexicon and Mefino's Trade Backpack from Chersonese in the beginning of the game, and you can either get Mana now, or wait until later. While you're here, also grab the Possessed and Cool boon spells, and eventually come back to get the Cabal Hermit Tree. In Enmerkar, I like to start out by getting as much money as possible from raiding the Cabal of Wind Temple over and over again, but in any case, you want to get the Mist boon spell, as well as Shim, Egoth, and Dez from the Rune Sage, also grabbing the Breakthrough and Runic Prefix over Internalized Lexicon. In the Hallowed Marsh, you're going to want to defeat the Light Mender at some point to get the Gold-Lich Mask, as well as eventually joining the Holy Mission, and also get the Warrior Monk Tree with an emphasis on Master of Motion, as well as the Blessed boon spell, in addition to the White Priest Hood. In Abrassar, we only really need to get the Warm boon spell. Caldera and the Sirocco Quest Line is what allows us to get our enchantments.
Overall, here are the skills we're going for throughout the game:
- Kazite Spellblade: Fitness, Steady Arm
- Mercenary: Fast Maintenance, Armor Training
- Speedster: Efficiency, Metabolic Purge
- Rogue Engineer: Sweep Kick
- Primal Ritualist: Miasmic Tolerance
- Cabal Hermit: Weather Tolerance, Shamanic Resonance
- Warrior Monk: Slow Metabolism, Brace, Focus, Steadfast Ascetic, Master of Motion, Counterstrike
- Wild Hunter: Enrage
- Rune Sage: Shim, [[Egoth, Dez, Well of Mana, Arcane Syntax, Runic Prefix
- Weapon Master: The Technique
- Burac / Markus: Puncture
- All the Boons (Duh)
- Holy Mission Questline: Acceptance, Divine Assistance, Elatt's Intervention, Purified, Sanctified Protection, Peacemaker Elixir, (If you're feeling risky, also Exalted)
There are many ways to get the different potions and things, but overall, the see their wiki pages for how to get them. Now in terms of actually USING the build, here's what you need to keep in mind:
Mana runs out. I recommend using either Leyline Water, Astral Potions, or various Foods to keep it up.
You're not completely invincible. You're pretty darn close, but there are definitely things that can kill you. Generally, be wary of fighting anything that deals ![]() Frost Damage, as well as a few very specific enemies:
Frost Damage, as well as a few very specific enemies:
The first is the Brand Squire, because is has an attack that deals Raw Damage, which if you've taken Exalted and have Life Drain, will one-hit kill you.
The second is easily and undisputedly the most dangerous creature to this entire build: The Scarlet Emissary.
Scarlet Emissaries singlehandedly dismantle this entire build, especially if you're using Exalted, and for two reasons. The first reason is their Self-Healing/Panic/Raw Damage Blast. It comes out very quickly, and if you're not prepared, will kill an Exalted build instantly even with max resistances. But to some extent, enough gamering can get past that. Not as much of a big deal, just be careful of it. The second thing, which is far more threatening, is the fact that EVERY MELEE ATTACK IT MAKES ignores 50% of ALL RESISTANCES. Meaning each attack does a MINIMUM of 18 damage. Which for an Exalted build, once again, is instant death. If you take Exalted, then just know, stay away from these things. At all costs.
Some of you may have caught by now that the whole "ignore 50% of resistances" thing isn't just for Scarlet Emissaries. It also applies to Ancient Dwellers, Medyse, Gargoyles, and probably even more enemies from Caldera that I don't know about. General rule of thumb is, if it's from Caldera, exercise caution. And always look up enemy stats on the wiki.
Another note: The reason we pick the enchantments we do is because of the fact that status effects can completely demolish us if we get applied with the wrong one. Especially Panic, since it completely disables resistances. Naturally, very bad for this build.
The only other major thing to note is that your buffs are literally the one thing keeping you at this level of defense, and they will very easily run out in the middle of a battle if you're not prepared for it. Make sure that you are re-applying your buffs when you need to. Doing this in the middle of a fight isn't the worst option, considering you're basically invincible anyway, but do so before they run out. Also check your Armor Durability, as that running out can also end very poorly. This is also the reason the Scholar Circlet is involved in the build, so as to make the time it takes for your Boons to recharge less than the time it takes for them to wear out. Below is a full Battle Prep Combo.
Combos
| Combat Prep Order | |||||
|---|---|---|---|---|---|
 > >  > >  > >  > >  > >  > >  > >  > >  > >  > >  > >  > >  > >  > > > >  > >  | |||||