Build:Master of None 2.0

Master of None 2.0 is a Character Build in Outward, created by Sk0ooma.
Summary
-
Master of None 2.0 This is the ultimate build! If you take Min/Maxing and apply it to QoL, this is what it looks like. Trivialize every part of the game & easily beat it solo in Hardcore.  Breakthroughs
 Required Faction 


Equipment Weapon Off-Hand Head Body Boots Backpack 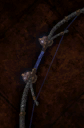 Snow
Snow 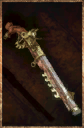 Trauma
  Calm Soul
 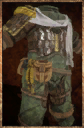 Cocoon
 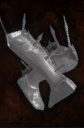 Economy
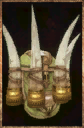
-
Quickslots 1 2 3 4 5 6 7 8 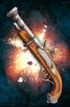


Full Build Detail
Overview
 Toughness: ►▰▰▰▰ [4/5]

 Magic Damage: ►▰▰▰▰ [4/5]

 Physical Damage: ►▰▰▰ [3/5]

 Movement Speed: ►▰▰▰▰▰ [5/5]

 Mana Management: ►▰▰▰▰ [4/5]

 Stamina Management: ►▰▰▰▰ [4/5]

 Health Management: ►▰▰▰▰▰ [5/5]

 Mechanical Intensity: ►▰▰▰▰▰ [5/5]

 Utility: ►▰▰▰▰▰ [5/5]

Stats


(5 points @ Leyline)
Skill Overview
Faction: Acceptance, Infuse Light, Purified, Divine Assistance, Sanctified Protection, Elatt's Intervention
Boons: Blessed (skill), Cool (skill), Mist (skill), Possessed (skill), Warm (skill)
Specialist: Acrobatics
Cabal Hermit: Reveal Soul, Mana Push, Weather Tolerance
The Speedster: Efficiency, Metabolic Purge
Kazite Spellblade: Steady Arm, Fitness, Shield Charge
Philosopher: Sigil of Fire, Mana Ward
Rune Sage: Rune: Dez, Rune: Egoth, Rune: Fal, Rune: Shim
Warrior Monk: Brace, Slow Metabolism, Focus
Wild Hunter: Enrage, Hunter's Eye
Hex Mage: Torment, Bloodlust, Blood Sigil, Lockwell's Revelation
Mercenary: Shatter Bullet, Frost Bullet, Fast Maintenance, Armor Training, Swift Foot, Marathoner, Blood Bullet
Rogue Engineer: Backstab, Sweep Kick, Pressure Plate Training, Opportunist Stab, Feather Dodge, Pressure Plate Expertise
Skill Breakdown
Engineer:
- Important skills:
Tier 1:
Sweep Kick
Opportunist Stab
Tier 2:
Feather Dodge
Tier 3:
Pressure Plate Expertise
Mercenary:
- Important skills:
Tier 1:
Tier 2:
Tier 3:
Hex Mage:
- Important skills:
Tier 1:
Tier 2:
Tier 3:
Equipment
Weapons:

- Long Range.
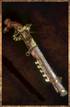
- After enchanted with Snow, this weapon becomes God tier when used with Soul Rupture Arrows. Apply Assassin Elixir and fire 3-4 arrows to inflict Extreme Poison, Aetherbomb, Slow Down, and Crippled. Watch the enemy slowly struggle to make it to you before they either die from poison or internally combust!

- Inflicts BOTH Haunted and Scorched and provides a bonus to both decay and fire damage.
- Can be used with blood sigil for the blood leech effect to become functionally invincible during boss fights.
- Main component of my Astral Cannon technique.
Recipe: Trinket Handle + Spike Prism + Waning Tentacle

- Inflicts BOTH Chill and Scorched and provides a bonus to both ethereal and lightning damage. TIP: Use w/ Blood Bullet to apply both debuffs simultaneously.
- Can be used as a ranged variant of my Astral Cannon technique.
Recipe: Trinket Handle + Blunt Prism + Waning Tentacle

- Second Highest Damage in game.
- W/ Trauma it does massive AoE damage. TIP: Combine w/ Frost Bullet as an AoE opener. This will do tons of
 &
&  damage and the Slow Down helps manage multiple enemies in solo play.
 - Can be used with blood bullet to restore health.

- Inflicts elemental vulnerabilty. TIP: Reload with Shatter Bullet when you can to also apply Pain.
- Can be used with blood bullet to restore health.

- Inflicts Weaken and Sapped. Use this against hurty enemies to make them hurt less. One shot for


 , two shots for
  .
. - Can be used with blood bullet to restore health and inflict BOTH status effect instantly.

- Inflicts Burning.
- Can be used with Blood Bullet to restore health and inflict Burning on 2 separate enemies simultaneously.
Recipe: Flintlock Pistol + Obsidian Shard + Palladium Scrap + Crystal Powder

- Inflicts Holy Blaze.
- Can be used after Obsidian Pistol with Blood Bullet to restore health and inflict instant Holy Blaze.
NOTE: This item must be retrieved from a Legacy chest!

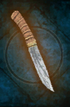
- Inflicts Confusion
- Can be used with Shatter Bullet to inflict Pain AND Confusion. This is known as the "Shatter Cannon" technique and when combined with Sweep Kick is your bread-and-butter opener. Hit 'em while they're down!
- Main component of my Astral Cannon technique.
- Can be used with blood bullet to restore health.

- +3% Movement Speed
- Restore +0.1 Mana per second
- Grants Runic Protection for 180 seconds (+15 physical resistance & +2 Protection)
- Summons a magical hands-free Lantern which lasts for 300 seconds (5 minutes)
- Deals 70 ethereal damage and 100 impact

- Inflicts Sapped (60% buildup)
- Provides immunity to Mild Petrification, Plague and Breathless.
- Provides a light which does not lower Stealth.
- Use with Toxin Bombs to decimate enemies!
Armors:

- Immune to Panic.
- +30% Fire and +30% Lightning resistance.
- -25% Mana Cost.
- Highest total resistance on head slot in the game.

- +2 Protection.
- +15% Decay resistance.
- +18 Hot Weather Defense, +18 Cold Weather Defense. Second best weather resistance in the game, enough to make the build completely immune to temperature.

- +3 Protection.
- +5% Ethereal & +10% Fire damage bonus.
- +5 Cold Weather Defense.
- -10% Mana Cost.
- -10% Stamina Cost.
- Easily the best tanky boots in the game for mobility and utility.
Backpack:

- -10% Stamina Cost.
- 85 weight capacity
- Slows down the decay of perishable items by 50%.
- Provides 2 Protection to the Durability of items in the backpack when hit by enemies.
- Has a lantern slot
- Combined w/ Feather Dodge & Acrobatics this bag provides unhindered dodge rolls and the fastest Movement Speed in the game! Goodbye bird masks!
Tent:

NOTE: Can be easily obtained early from the Friendly Immaculate in Caldera by asking for shelter.
Pros & Cons
Pros
- High damage
- Extremely versatile & resilient
- Tanky
- Infinite sprint
- Fastest movement speed in the game
- Auto-maintaining stat burn
- Weather immunity
- In-combat healing
- Infinite light
- Free buffs & ammo
- Does not rely on main hand melee weapons, providing flexibility and personalization
Cons
- Carries lots of equipment
- Still has to repair
- Co-op partner usually can't keep up in some way
Getting Started
This build needs very little to function. To get started you should focus on acquiring:
- Bloodlust
- Possessed (skill)
- Blood Bullet
- Obsidian Pistol
- Cannon Pistol
- Sweep Kick
- At least 3 points of mana
- A Bow of choice (preferably Wolf Bow)
- A dagger of choice
- Decent armor
Important milestones:
- Get Possessed (skill) and Calygrey Bone Cage from the Friendly Immaculate BEFORE joining The Holy Mission of Elatt!
- Get Divine Assistance from Doubts and Secrets.
- Make sure to complete Blood Under The Sun so you can buy Chimera Pistol.
- Make sure to get Acceptance from Truth and Purpose.
Combat & Utility
Tips & Tricks:
- Take 3-4 points when acquiring mana, then increase to 5 total by end game. This is not mandatory, but I have found that balanced stats tend to be ideal.
- Don't forget having the Needs: Tired effect active regenerates mana and boosts damage.
- Combine Toxin Bombs with Angler Shield to inflict plague when needed. Having (corrupted and/or defiled) will boost damage.
- Can utilize the Corruption Spirit when Defiled to heal and load a shot for later encounters with Blood Bullet.
- Can heal allies using Gift of Blood.
- Keep around 5 Pressure Plate Traps on you to load w/ a Ghost's Eye, Fire Stone, or Cold Stone in appropriate situations.
- Use a Ghost Drum as cover to block projectile attacks. This can buy you time to reload, manage inventory, or just take some pressure off.
- The Ghost Drum will also boost damage of your Runic Trap and Ethereal Pressure Plate Traps.
- Save hotkeys by starting tough encounters with a debuff from your Chimera Pistol and then immediately swapping it out. (see the God Slayer configuration below).
- Fully utilize my "Hot Pocket" technique (see below) to effectively add 2-3 more hotkeys by rotating weapons in your pocket menu.
- Use my NO BREAKTHROUGH "Astral Cannon" technique (also see below) to quickly inflict Haunted, Scorched, Pain, Confusion, Bleeding, Burning, and Extreme Poison, as well as 192 Physical, 48 Lightning, 30 Ethereal, 20 Fire, and 50 Impact.
NOTE: Astral Dagger will increase damage of both Burning and Extreme Poison, Scorched will also boost Burning.
Hot Pockets & Astral Cannon
Hot Pockets:
When playing with a controller, opening the inventory menu will ALWAYS automatically place your cursor on the FIRST slot on your POCKET inventory. This means that just by quickly pressing the menu button and A (or X depending on what type of controller you’re using) you will instantly “use” whatever is in your pocket’s first slot. Items have a “memory” of where they are stored in your inventory...so if you had a weapon in your bag and equipped it, when un-equipping it, it would go BACK to the bag...same for if it was in the POCKET. With careful management and a bit of knowledge, you can set up your pockets to cycle through whatever gear you want for any given build or situation. For example, in the Jack of All combat configuration below, Wolf Bow is in the Hot Pockets designation. This means that it has been placed FIRST in your pockets, and the other items have been assigned to hot keys or placed in the pockets after the bow. By doing this you are able to quickly swap back and forth between your bow, gun, lexicon, and shield, without having to actually use up a slot for the bow. Another thing to note, is that if you have multiple guns (or whatever) in your pockets, then each time you equip one it will place the next in line as your first slot, allowing you to easily cycle through or swap back and forth. Experiment with different loadouts to find what works best for you!
Astral Cannon:
A sort of “mini build” you can use relatively early on any build with NO breakthroughs.
Hotkey Configurations:
A list of optimal hotkey setups for various situations.
- Jack of All: Utilize everything at your disposal! Ready for anything!
- Astral Cannon: A highly specialized and powerful setup for mid-tier encounters.
- God Slayer: You ARE the chosen one!
| Jack of All | |||||
|---|---|---|---|---|---|
 > >  > >  > >  > >  > >  > >  > >  | |||||
- HOT POCKET: Wolf Bow
| Astral Cannon | |||||
|---|---|---|---|---|---|
>  > >  > >  > >  > >  > > > >  | |||||
- HOT POCKET: Astral Dagger & Cannon Pistol. Move Wolf Bow to Backpack.
| God Slayer | |||||
|---|---|---|---|---|---|
 > > > >  > >  > >  > > > > > > | |||||
- HOT POCKET: Astral Dagger & Wolf Bow.
- Begin the encounter with a shot from your Chimera Pistol, then immediately swap it out.